Table of Contents
A gender-neutral baby shower keeps the focus on love, family, and the excitement of welcoming a new baby, without the pressure of choosing pink or blue. It creates a warm, inclusive atmosphere for guests of all ages and backgrounds while allowing flexible, soft color palettes like green, yellow, grey, and gentle neutrals that often work with decor you already own. This approach helps reduce costs, supports creative themes such as nature, travel, or simple patterns, and makes planning feel lighter, so you can spend more energy on meaningful moments, shared food, and lasting memories.
DIY Party Planning Basics
Planning a party can feel like a mountain, but breaking it down into small, doable steps turns it into a series of gentle hills. Start with three core questions: What’s your budget? How many guests will you invite? And what vibe do you want the day to have? Write the answers down, then move on to a simple timeline. Give yourself at least four weeks for a baby shower, three weeks for a kids’ birthday, and two weeks for an adult celebration if you’re short on time. Use a printable checklist (we’ll share one later) to keep track of tasks like ordering supplies, confirming the venue, and sending reminders.
Remember, you don’t have to do everything yourself ask a friend to bring the cake, another to help set up balloons, and a sibling to manage the music playlist. Delegating small jobs spreads the workload and makes the whole experience feel like a team effort. Keep a folder digital or paper where you store all receipts, vendor contacts, and inspiration photos. When everything is in one place, you’ll spend less time searching and more time enjoying the planning journey.
Printable checklist for easy DIY party planning
A printable checklist is like a friendly sidekick that reminds you what’s next and celebrates each tiny win. Below is a simple list you can print, cut into sections, and stick on your fridge or pin to a board.
- Set a realistic budget and note where you can save (DIY decor, bulk snacks).
- Choose a gender‑neutral theme that feels personal to you.
- Draft a guest list and decide whether you’ll have a virtual option.
- Send invitations at least three weeks before the event.
- Plan the menu think finger foods, a simple cake, and a signature drink.
- List all décor items you need: balloons, tablecloths, signage, and centrepieces.
- Gather DIY supplies: cardstock, ribbon, glue gun, and any craft tools.
- Schedule a day for set‑up and a separate time for clean‑up.
- Confirm any rentals (tables, chairs, sound system) a week ahead.
- Write thank‑you notes or printable cards to send after the party.
Print this list, check off each item as you go, and you’ll see the day coming together piece by piece. The visual progress keeps stress low and confidence high.
Budget‑friendly baby shower decor ideas
Decor can look stunning without costing a fortune. Start by scouting your own home for items you can repurpose: mason jars become candle holders, old picture frames turn into photo displays, and leftover fabric can be cut into bunting. For a fresh look, buy a few rolls of neutral colored crepe paper this cheap material can be twisted into elegant ribbons, draped over tables, or used as a backdrop.
Balloons are a budget hero buy a bulk pack of white or pastel balloons and add a few metallic ones for a pop of sparkle. If you enjoy crafting, make paper flowers from tissue paper or coffee filters these are inexpensive and can be glued onto sticks for easy handling. Use nature as décor: pine cones, fresh herbs, or seasonal leaves add texture and scent without extra cost. Finally, shop sales or discount stores for items like wooden crates, which can serve as stylish storage for gifts or as a base for centre pieces. By mixing DIY projects with a few smart purchases, you’ll create a polished look that feels high‑end while staying well within your budget.

Printable Essentials
Printables are a lifesaver when you want a cohesive look without hiring a designer. They let you match fonts, colours, and graphics across invitations, signs, games, and thank‑you cards. The best part? You can edit them on your computer, print at home, or take the file to a local print shop for a professional finish. We’ll share free templates that are easy to customize, plus ideas for turning everyday paper into fun party elements. Whether you’re planning a baby shower, a kid’s birthday, or an adult celebration, printable tools keep everything organized and on‑brand, and they’re reusable for future events.
Free invitation and sign templates you can customize
There are many websites that offer free, editable basic invitation templates Canva, Adobe Express, and even some blog sites provide ready made designs. Look for templates that use neutral colors like sage, ivory, or soft grey, and that have space for your own wording. When you open the file, replace the placeholder text with your details: host name, date, time, location, and RSVP information.
Add a small icon that matches your theme perhaps a tiny leaf for a nature inspired shower or a simple globe for a travel theme. For signs, create matching Welcome, Gift Table, and Restroom signs using the same font and color scheme. Print them on sturdy cardstock or photo paper for a polished feel. If you want a greener option, print on recycled paper and use a local print shop that offers eco friendly inks. Having all your paper pieces share the same design language ties the whole event together and makes you look like a pro, even on a modest budget.
Printable games and thank‑you cards for guests
Games add laughter and help guests mingle, and printable versions are quick to set up. For a gender‑neutral baby shower, try Baby Word Scramble, Guess the Due Date, or a simple Baby Bingo where each square contains items like diaper, rattle, or storybook. Download a template, fill in the words, and print enough copies for all guests. Use a clipboard or a small table to hold the game sheets and pens.
After the party, send thank‑you cards that match your invitation design. Write a short, heartfelt note that mentions a specific gift or moment this personal touch makes the gratitude feel genuine. If you’re short on time, you can email a printable thank‑you card that guests can print at home. The key is consistency: matching fonts, colors, and graphics across invitations, games, and thank‑you notes creates a seamless experience that feels thoughtful and organized.

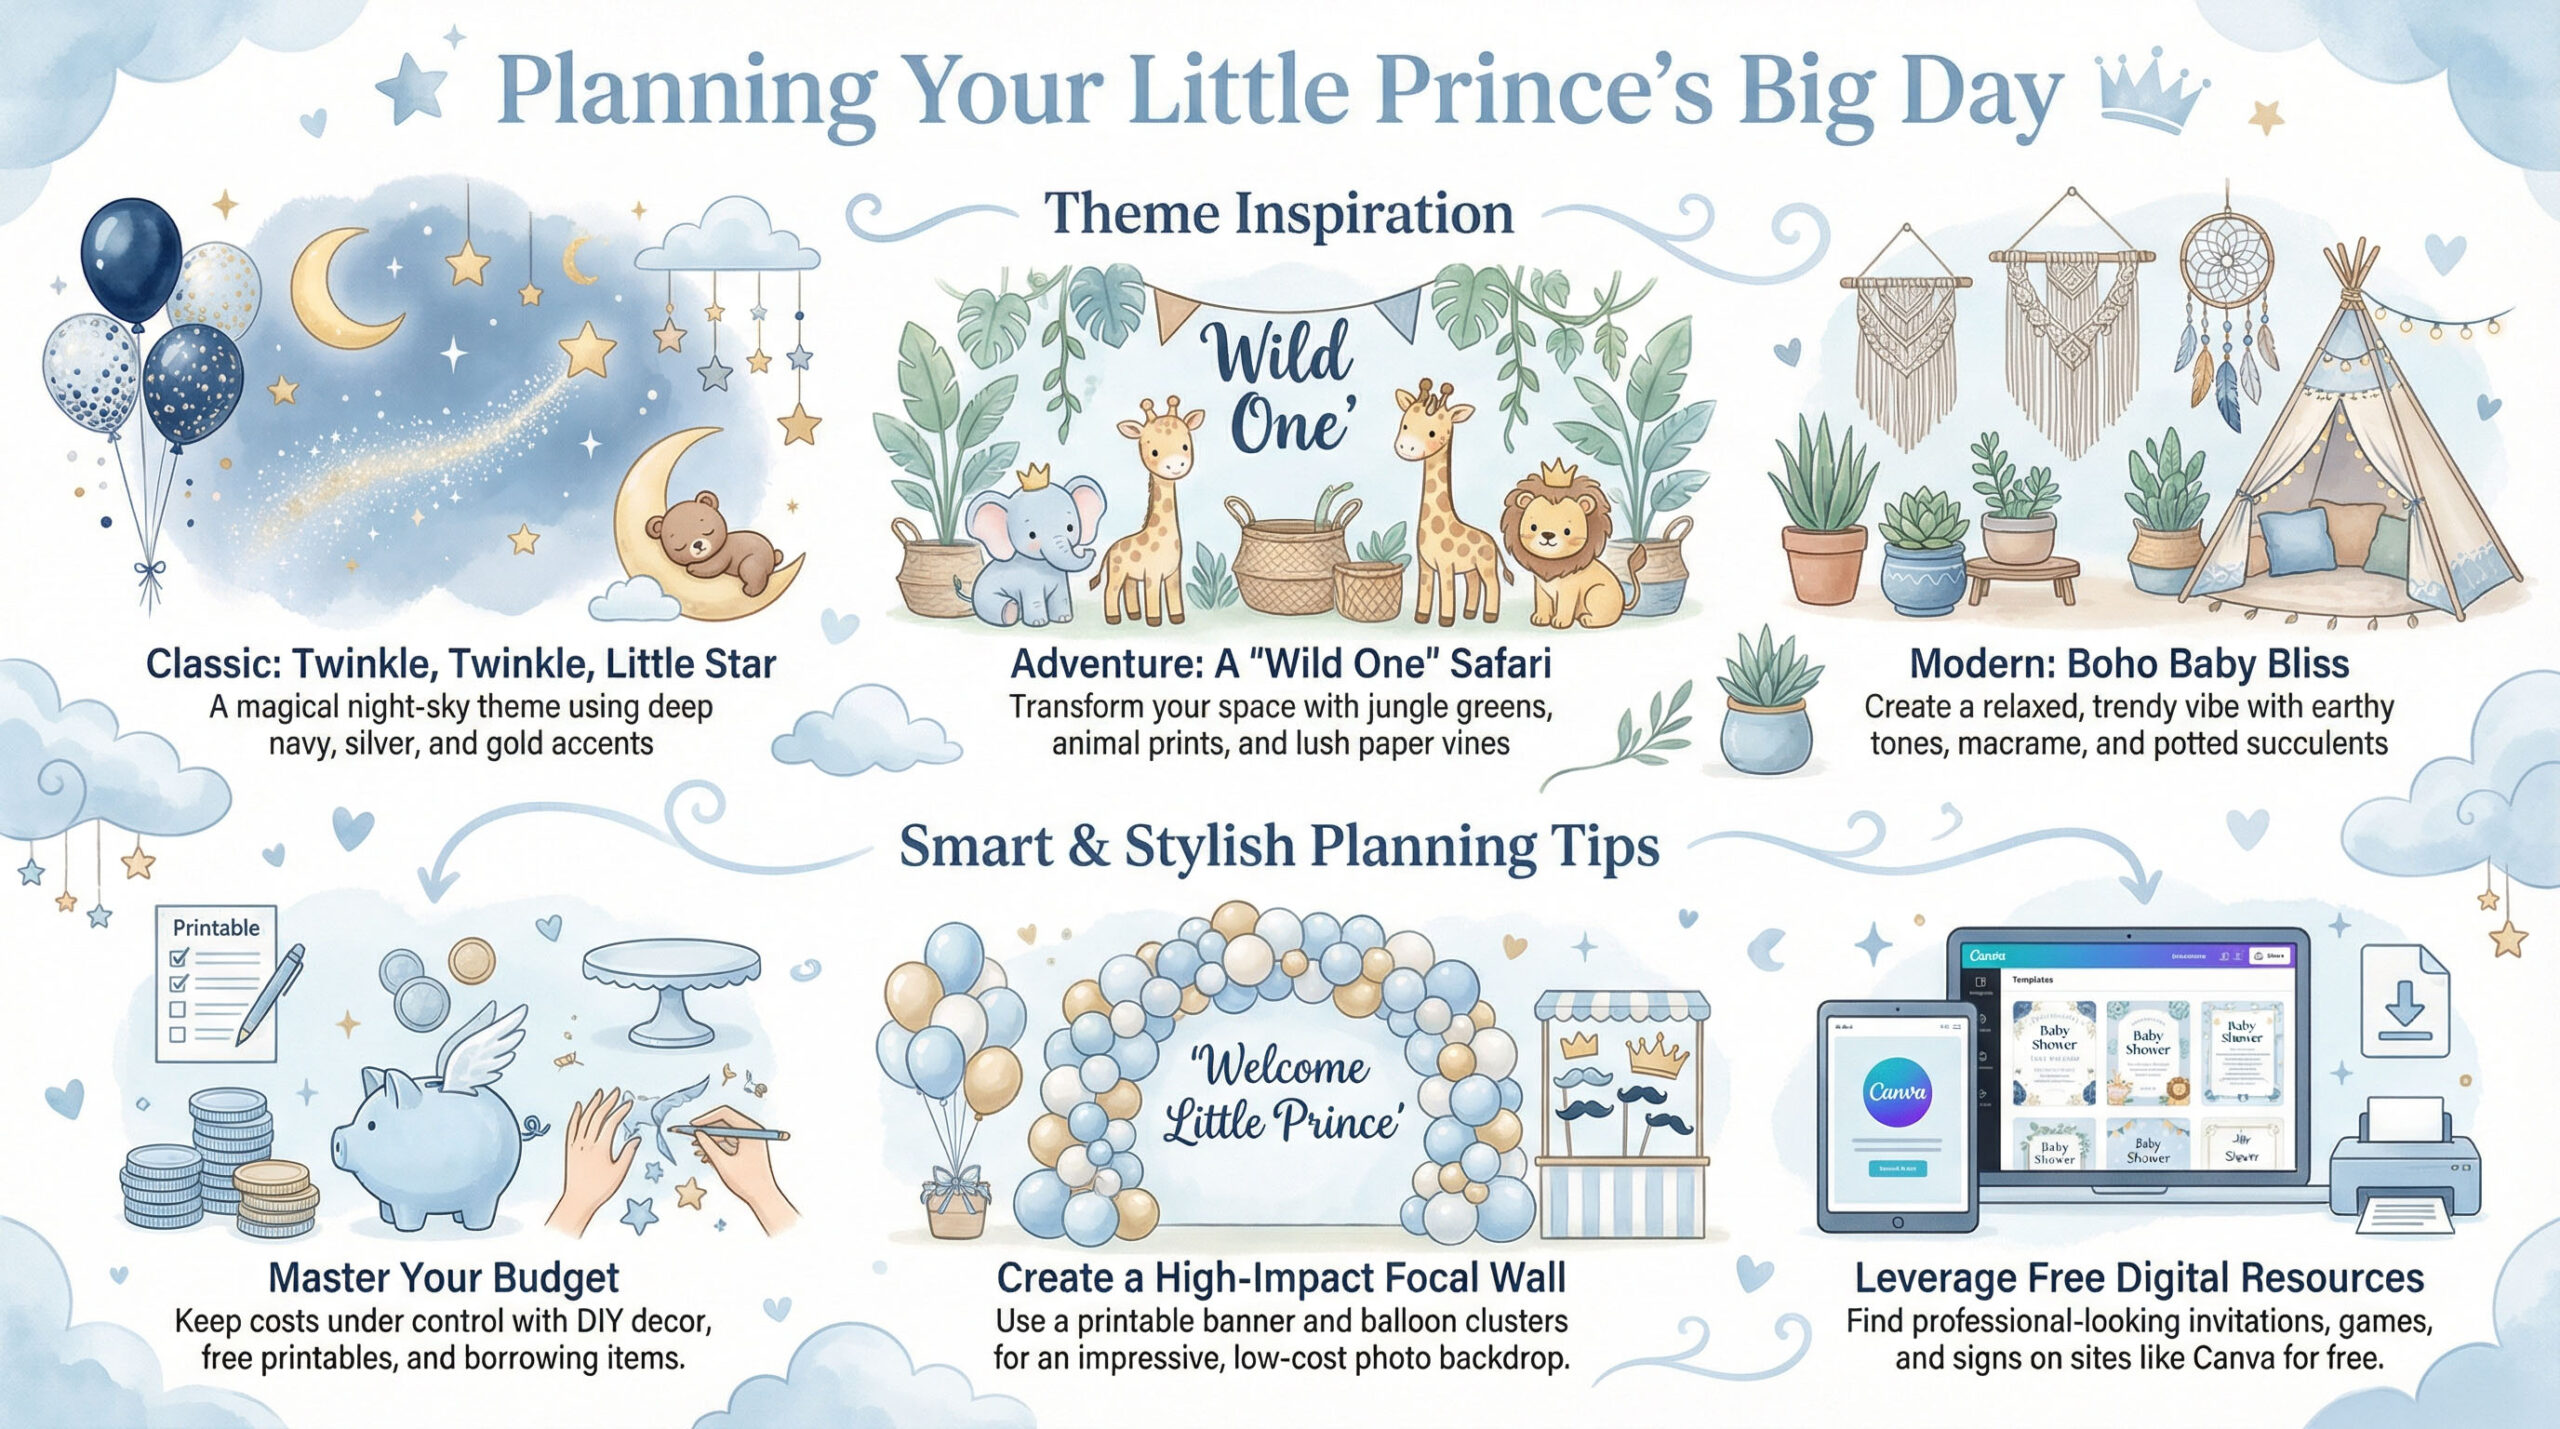
30 Gender‑Neutral Baby Shower Theme Ideas
Choosing a theme gives your party direction and makes decor decisions easier. Below are five groups of ideas, each with a few specific options. Feel free to mix and match elements maybe you love the woodland feel of a nature theme but also want the travel vibe of a map banner. The goal is to pick what feels right for you and your family, and then let the details fall into place.
Nature‑Inspired (Woodland, Garden, Ocean)
- Woodland Wonder – Think soft moss greens, tiny pine‑cone centrepieces, and animal silhouettes like deer or owls. Use burlap table runners and wooden crates for a rustic feel.
- Garden Party – Fresh flowers, pastel leaves, and a simple “grown‑up garden” sign. You can create mini terrariums with succulents as table decor.
- Ocean Breeze – Light blues, seashell accents, and a wave‑shaped backdrop. Hang paper fish or use a net draped over the dessert table for a beachy touch.
These nature themes work well for kids birthdays too just swap the baby‑related wording for “birthday adventure” and they translate beautifully to adult celebrations when you add a touch of elegance, like gold‑rimmed glasses or a cocktail bar.
Travel & Adventure (World map, Hot‑air balloon, Camping)
- World Explorer – Use a large world map as a backdrop and let guests pin a place they hope the baby will travel to. Small suitcase décor and passport‑style invitations add charm.
- Hot‑Air Balloon Festival – Soft pastel balloons, cloud‑shaped cut‑outs, and a “up, up, and away” banner. You can even create a DIY balloon arch using helium‑filled balloons in neutral tones.
- Camping Night – Faux campfire centrepieces made from orange tissue paper, pine‑cone lanterns, and a “tent” photo booth. Serve s’mores‑style treats for a cozy vibe.
Travel themes are perfect for a teen birthday party—just replace the baby shower wording with “birthday expedition”—and for adult milestones, you can add a signature cocktail named after a favorite destination.

Minimalist & Modern (Monochrome, Soft pastels, Geometric)
- Monochrome Elegance – Choose a single colour (like charcoal or navy) and use different shades for depth. Simple black‑and‑white line drawings make great signage.
- Soft Pastel Paradise – Blend muted pinks, mint, and lavender for a calm, airy look. Use clear acrylic holders for candles to keep the space light.
- Geometric Wonderland – Cut out triangles, hexagons, or chevrons from cardstock and arrange them on walls or tables. Stick to a neutral palette of greys and whites for a sleek finish.
Minimalist designs are easy to replicate for any age group. For a child’s birthday, add a splash of bright colour in the cake; for an adult party, incorporate metallic accents like copper or rose gold.
Whimsical & Playful (Clouds, Balloons, Puzzle pieces)
- Cloud Nine – White and silver clouds cut from foam board, hanging from the ceiling, with a soft blue backdrop. Add fluffy cotton “cloud” centrepieces for a dreamy feel.
- Balloon Fiesta – A cascade of balloons in varying sizes, tied together with ribbon. Use balloon letters to spell out the baby’s name or a simple “Welcome.”
- Puzzle Pieces – Create large cardboard puzzle pieces that fit together on a wall. Each piece can hold a guest’s name or a wish for the baby.
These playful ideas translate naturally to kids’ birthday parties—just swap the baby name for the birthday child’s name—and they add a fun, relaxed atmosphere to adult gatherings when paired with sophisticated food and drinks.
Cultural & Seasonal (Global mosaic, Spring blossom, Winter wonderland)
- Global Mosaic – Use patterned fabrics or paper from different cultures as table runners. Offer a small “passport” activity where guests write a wish in their native language.
- Spring Blossom – Fresh cherry‑blossom branches, pastel ribbons, and a floral arch. Serve light, seasonal bites like fruit skewers and herb‑infused water.
- Winter Wonderland – Sparkling snowflake cut‑outs, silver accents, and a faux‑snow backdrop. Warm drinks like hot chocolate or spiced cider keep guests cozy.
Cultural themes celebrate family heritage and can be adapted for any celebration—just replace baby‑related wording with birthday wishes or anniversary greetings. Seasonal ideas are especially handy because you can source décor that’s already in season, saving money and adding authenticity.
Storybook & Imagination (Classic, Soft, Timeless)
- Classic Storybook
Soft illustrations from classic children’s books, neutral beige and cream tones, open book centrepieces, and handwritten quote cards. - Once Upon a Time
Fairytale symbols like stars, castles, and crowns in muted colours. Linen tablecloths and parchment-style signage work well here. - Little Dreamer
Moon, stars, and sleepy clouds in warm neutrals. Perfect for calm lighting, fairy lights, and soft fabric backdrops.
Animal & Nature Friends (Cute but Balanced)
- Safari Friends
Lions, giraffes, and elephants in earthy tones. Use kraft paper signs and simple wooden animal figures. - Forest Friends
Bears, foxes, rabbits, and mushrooms. Works well with felt décor, soft greens, and natural wood textures. - Under the Stars (Animals at Night)
Owls, bears, and stars on a navy and cream palette. Add soft lighting and constellation prints.
Art & Creative Concepts (Modern but Warm)
- Watercolor Neutrals
Abstract watercolor splashes in sage, sand, and clay shades. Great for printable invitations and wall art. - Handmade Craft Studio
Scissors, yarn, buttons, and paper textures. Guests can leave wishes on small craft tags. - Little Artist
Mini easels, neutral paint palettes, and canvas backdrops. Works for baby showers and kids’ birthdays alike.
Retro & Nostalgic (Soft Vintage Feel)
- Vintage Airplanes
Old-style planes, clouds, and maps in sepia tones. Pair with suitcase décor and kraft envelopes. - Retro Rainbow (Muted)
Arched rainbows using soft mustard, clay, and sage instead of bright colours. - Classic Toys
Wooden blocks, stacking rings, and pull toys. Clean, simple, and easy to reuse later.
Symbolic & Concept Themes (Meaningful and Flexible)
- Little Sprout
Plants, seeds, and growth symbols. Potted herbs or seedlings double as guest favors. - Bright Future
Light bulbs, stars, and abstract paths. Guests write wishes for the baby’s future on cards. - Simple Welcome
Typography-focused theme with phrases like “Hello Baby” or “Welcome Little One.” Neutral colours and minimal décor keep it calm and modern.
DIY Decor to Match Your Theme
Now that you have a theme, it’s time to bring it to life with décor you can create at home. DIY projects let you add personal touches, keep costs low, and give you the satisfaction of seeing your vision become real. Below are two easy‑to‑follow projects that work for any of the themes above.
Easy banner and backdrop projects you can make at home
A banner or backdrop instantly sets the mood and serves as a perfect photo‑op spot. Start with a simple canvas: a sheet of kraft paper, a roll of fabric, or a large piece of foam board. Cut the material to the width of your wall or table. For a nature theme, paint or stamp leaf silhouettes onto the background. For a travel theme, glue a world‑map printout and add tiny paper airplanes.
Use a hole‑punch and string to hang the banner, or attach it with removable adhesive strips if you’re renting a venue. To add depth, layer different shapes—triangles for a geometric look, clouds for a whimsical vibe using cardstock in coordinating colors. Finish with a few fairy lights draped across the top for a soft glow. This project takes under two hours and uses supplies you likely already have, keeping the budget friendly.
Simple centrepieces from everyday items
Centrepieces don’t need to be elaborate to look lovely. Gather a few everyday items and give them a theme‑specific twist. For a garden theme, fill glass jars with fresh herbs, small succulents, or wildflowers, and tie a twine ribbon around the neck. For a minimalist look, stack white candles of varying heights on a mirrored tray and sprinkle a few silver confetti pieces.
For a travel theme, place a small globe or a stack of vintage suitcases, and top each with a tiny flag that matches your color palette. If you’re short on time, use a simple bowl of seasonal fruit vapples for autumn, berries for spring sprinkled with a few decorative leaves. These centrepieces are easy to assemble, reusable for future events, and add a cohesive touch that ties the whole party together.
Free Checklist
The final checklist is your safety net. It reminds you of the last few things to do on the day of the event and helps you avoid any last‑minute panic. Keep it printed and tucked into a folder or saved on your phone for quick reference.
Timeline from planning to clean‑up
- 6–8 weeks before – Choose your gender‑neutral theme, set a budget, and book the venue (if needed).
- 4–5 weeks before – Send out printable invitations and start gathering DIY supplies.
- 3 weeks before – Finalize the menu, order the cake, and confirm any rentals.
- 2 weeks before – Print games, signage, and thank‑you cards. Assemble any décor that can be pre‑made, like banners or centrepieces.
- 1 week before – Confirm the guest list, create a seating plan if needed, and do a quick walk‑through of the venue.
- Day of the event – Set up décor early (at least two hours before guests arrive), arrange food stations, and place games on a side table. Keep a small “to‑do” list handy for final touches like lighting candles or arranging flowers.
- After the party – Collect all reusable décor, store them for future events, and send thank‑you cards within two weeks.
Following this timeline spreads the work out, so nothing feels rushed and you can enjoy the celebration alongside your guests.
Printable final checklist you can download
We’ve created a simple, printable checklist that covers every step from the first idea to the final clean up. It’s organized into three columns: Task, Completed, and Notes. You can print it on a single A4 page, cut the columns into strips, and stick them on a wall with removable tape. As you finish each item, slide a checkmark into the Completed box and jot any reminders in the Notes space. The checklist includes sections for:
- Budget tracking
- Guest list and RSVPs
- Invitations and signage
- Food and drink planning
- DIY decor creation
- Day of setup and clean up
Download the file, print it out, and keep it on your kitchen counter or home office desk. Seeing each task ticked off will give you a sense of progress and keep stress at bay.
FAQs
What are some quick printable games for a baby shower?
“Baby Bingo,” “Guess the Due Date,” and “Word Scramble” are easy to set up. Just download a template, fill in the details, and print enough copies for all guests.
How do I keep costs low without looking cheap?
Mix DIY projects with a few strategic purchases. Use items you already own, shop sales, and print your own invitations and games. Simple touches like twine, greenery, and candles add elegance without high price tags.
Can I use the same theme for a kids’ birthday party?
Absolutely! Swap baby‑related wording for the birthday child’s name, and adjust the food and games to suit the age group. The décor ideas work for any celebration.
What if I don’t have a lot of space for décor?
Focus on vertical décor like hanging banners, balloon arches, or wall‑mounted signs. Small centrepieces and a few statement pieces can fill the room without crowding the floor.